List and Explain Different Methods to Draw Circle in Autocad
Circles and Ellipse command
Circles
The circles are widely used in design and drawings.
The circle control is used to draw a circle past specifying the heart point and radius.
Let'southward sympathize past 2 examples.
Example ane:
The steps to create a circle are given below:
- Click on the Circle icon on the Ribbon Panel, equally shown in the below image:

OR
Blazon Circumvolve or C on the command line and press Enter. - Specify the centre betoken of a circle on the workspace or viewport.
- Specify the radius of the circle.
Or
To specify bore, type D - press Enter - specify the bore of the circle. - Press Enter.
Case 2:
We tin can also create the circumvolve randomly. The steps are listed below:
- Click on the Circle icon on the Ribbon Console, as shown in the below image:

OR
Type Circumvolve or C on the command line and printing Enter. - Specify the centre point of a circle on the workspace or viewport.
- Specify the endpoint of the radius through the cursor.
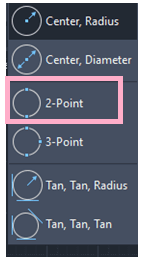
Types of Circles
There are three types of circles, which are listed below:
- 2 bespeak circle
- three indicate circle
- Tangent circle
1) 2 Point circle
We can create a circle by specifying the ii endpoints.
The altitude between the ii specified endpoints volition be considered every bit the diameter of that circle.
Let's empathise with an example.
Example: A circle betwixt two lines.
The steps to create a two-indicate circle are listed below:
- Select the 2-Betoken circumvolve option from the drop-downwardly listing of the circle, as shown in the below image:
Or
Type C or Circumvolve on the control line - Press Enter- type 2P - press Enter. - Click on the first endpoint of a circumvolve diameter. We tin also type the value to specify the endpoint.
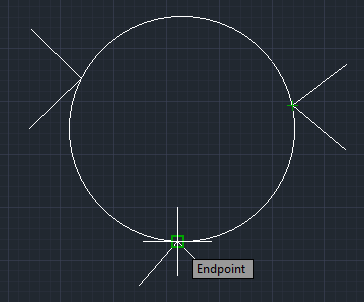
- Click on the 2d endpoint of a circle diameter through the cursor, every bit shown in the beneath image:
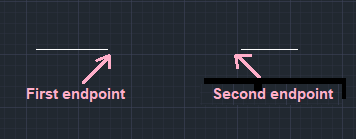
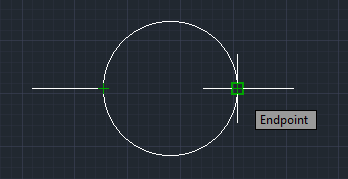
We can specify the endpoints according to the requirements. - The circle will exist created, as shown in the beneath paradigm:
2) three Point circle
Nosotros can create a circumvolve by specifying the three endpoints.
Let's understand with an example.
Example: A circumvolve betwixt three edges.
The steps to create a 3-indicate circle are listed beneath:
- Create iii edges.
- Select the 3-Point circumvolve choice from the drib-down list of the circle, equally shown in the below prototype:

Or
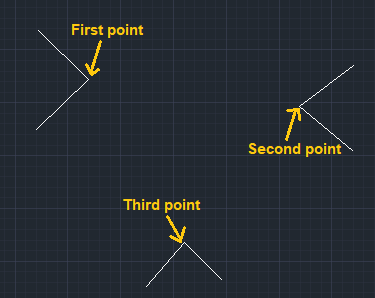
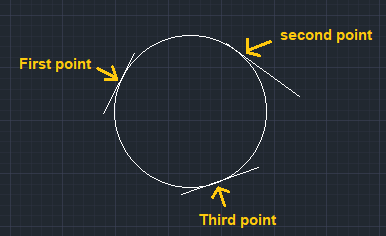
Type C or Circle on the command line - Press Enter- type 3P - press Enter. - Click on the first indicate.
- Click on the second point.
- Click on the third indicate.
The iii points are shown in the beneath image:
- The circumvolve will be fatigued, as shown in the below image:
Tangent circle
The tangent circle control is used to describe circles on the tangent.
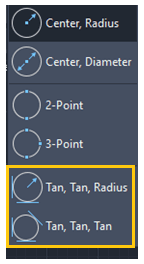
In that location are ii types of the tangent circle, that appear on the drib-down list of the circle icon on the ribbon console, as shown in the below image:
Let's understand with three examples.
Example 1: Tan, Tan, Radius
The steps to create a Ttr (Tangent tangent radius) circle are listed beneath:
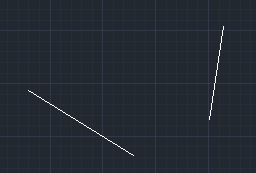
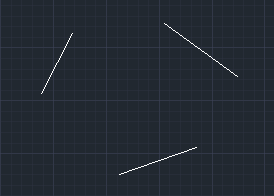
- Draw two lines in the viewport, as shown in the below image:
- Select the Tan, Tan, Radius circumvolve option from the drop-down listing of the circle on the ribbon console.
Or
Blazon C or Circle on the command line - Printing Enter- blazon ttr - press Enter. - Click on the first indicate on the showtime tangent.
- Click on the second betoken on the other tangent.
- Specify the radius of the circle. For example, 4.
- The circle volition be drawn on the two tangents, as shown in the below image:
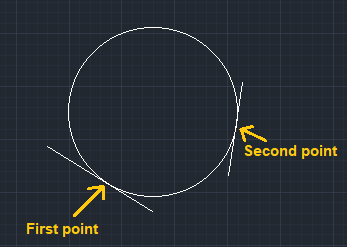
The circle will be adjusted according to the specified radius.
Case 2: Tan, Tan, Tan
The steps to create a (Tangent tangent tangent) circumvolve are listed below:
- Draw 3 lines on the viewport, as shown in the below image:
- Select the Tan, Tan, Tan circle option from the drop-downward list of the circle.
- Click on the first point on the offset tangent.
- Click on the second point on the second tangent.
- Click on the 3rd betoken on the tertiary tangent.
- The circle will be drawn on the three tangents, as shown in the below image:
We can modify the tangent and points co-ordinate to the requirements.
Example 3: Tan, Tan, Radius
To create a circle inside a triangle
The steps to create a circle within a triangle are listed beneath:
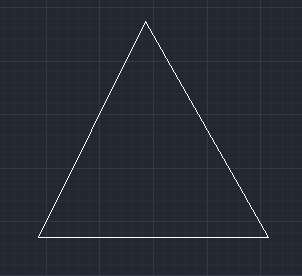
- Depict a triangle in the viewport, every bit shown in the below image:
- Select the Tan, Tan, Radius circle option from the drop-down list of the circumvolve. Or
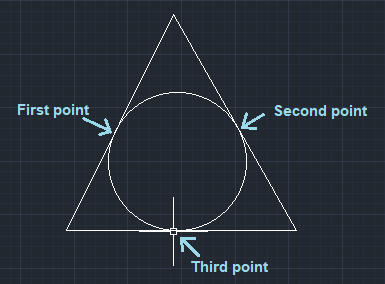
Blazon C or Circle on the command line - Printing Enter- type ttr - printing Enter. - Click on the offset point on one side of the triangle.
- Click on the second and third points on the other side of the triangle.
- The circumvolve will exist fatigued inside the circle, as shown in the below image:
Source: https://www.javatpoint.com/autocad-circles-and-ellipse-command
0 Response to "List and Explain Different Methods to Draw Circle in Autocad"
Post a Comment